Wednesday, December 21, 2011

Swap, Mend and Re-Use

There have been murmurs of a clothes swap for a while now. But while Gav and I were away was when the idea of something a bit more than just a clothes swap dawned on me. With the war time mantra of Make Do and Mend rattling around in my head I came up with Swap, Mend and Re-use. While the war time mantra was born out of a necessity to maximise scarce resources, this new mantra has been born more out of a desire to be resourceful with what we already have, without the usual exchange of money and with the underlying theme of re-use. Contrary to 1940's UK, here in Australia we have access to plenty of cheap (and not so cheap) clothing, most likely to have been made by those who have so little to begin with and are receiving an inadequate amount for the work they are doing to put layers of clothes on our backs. Add to that the environmental impact of our clothing habits and I'm left a more than a bit embarassed to admit that I bought a pair of shoes for $4.80 from Target the other day.  My only consolation is that the big company didn't get the highest price at point of sale from me. Not much of a consolation - these are complex issues!

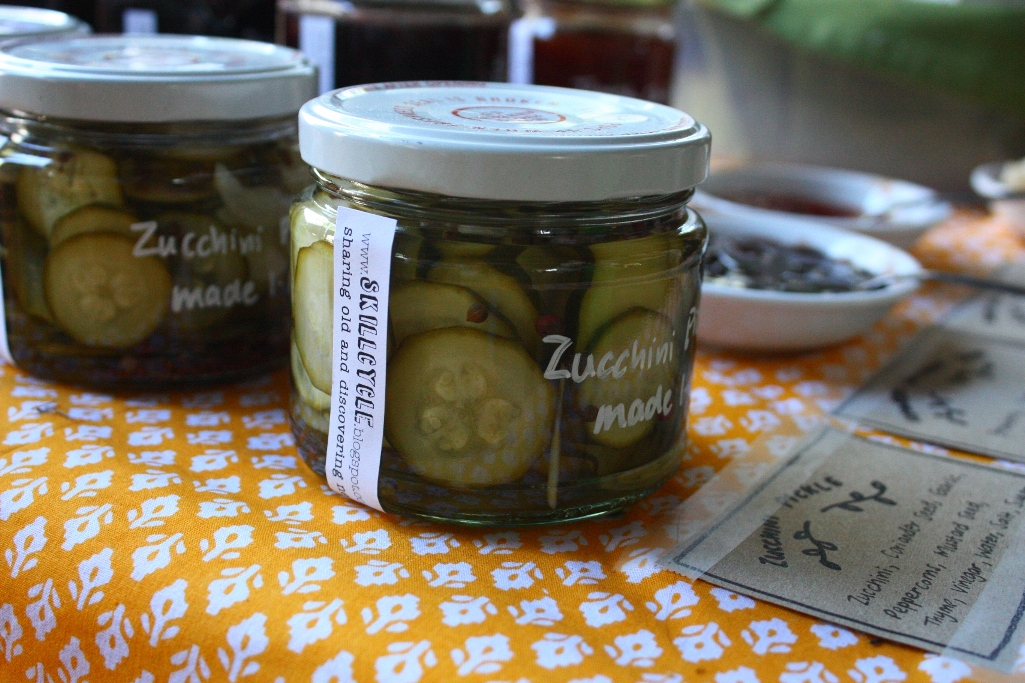
But anyway, I don't want to get too heavy and not highlight the fun, because the day WAS fun! And I am really thankful to all those who came to share resources, skills, friendship, time and tasty treats on a beautiful Saturday morning.

The day was planned in a relatively short time frame. Emails and facebook stuff sorted, a few old sheets, a hot kettle, a few sewing machines and a couple of skilled folk ready to share their knowledge was all that it took (thanks mum, sis and others!). I was so chuffed to see all those that came along and made the day as excellent as it was. Here's some snaps of what went on:


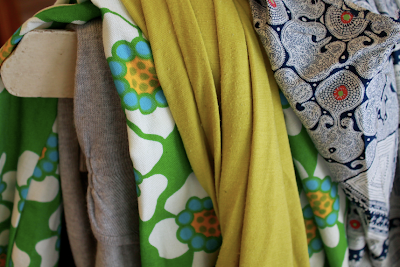
Items of clothing happily swapped or lined up for some re-fashioning


Clever hands helping on the sewing machine


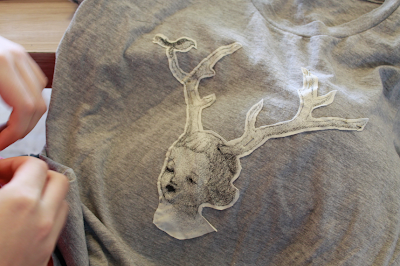
 A favourite shirt being salvaged and sewn on to another


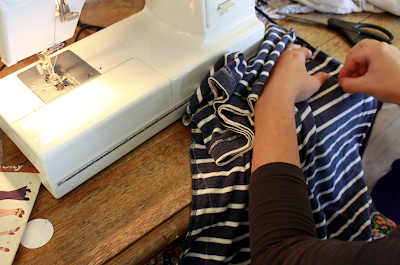
A shirt being transformed in to a skirt


A little cutie enjoying the piles of clothes that were begging to be hidden under 


Thanks to all those that came along! 
I heard a few people talking about their fabric collections and desire to actually make things from said collections (Me included! My op shopped piles of fabric need to stop growing and turn in to things!). So I was thinking I'd be keen to have a Sew, Mend and Re-Use day sometime in the new year. The lead up could involve sharing patterns, online tutorials and other inspiration...

And yes, I'm still keen to make undies out of old shirts. That might be a tutorial of it's very own! 

Melania


Tuesday, December 20, 2011

Food...and where it comes from

I think about food a lot. Cooking it, eating it, growing it. But I also think about where it comes from. Not just the store but the real source of what I'm eating. I'm always trying to find the best option which meets my financial and moral (and taste) needs. I ask myself questions such as: "Is it better to choose an organic product from overseas or a local non-organic product?" or "What about when the quality of the imported product is higher (like with Italian canned tomatoes) and the product is so much cheaper?". I have to weigh these concerns against a tight budget of both time and money. I think these are pretty common limiting factors for many of you. 


Over this past year my partner (Andy) and I have been discussing our food choices in fairly serious ways. We'd been slowly reducing the amount of pre-made food we purchased and our food bills had dropped significantly. We did this by replacing things such as tortillas, bread and pasta with home made versions and buy simply limiting the amount of 'junk' food we purchased. The majority of our shopping is now for the ingredients to make food instead of ready made food. We can also afford to purchase more organics and high quality products. When we see shelf-stable products on special we purchase multiples and stockpile. We also signed up for our local Community Supported Agriculture group Food Connect. Food Connect provides subscriptions of fruit and vegetables sourced from local, sustainable, chemical free or organic growers and gives a fair price to the farmer (approximately 40% of the sale price compared to 4-6% the large chains offer). The food is great and it has put us back in touch with the seasons and the effect weather can have on food production. 


We also spoke about meat. I'm a vegetarian and have been all my life. Andy has always eaten meat, and was raised in a meat-and-three-veg family. He has reduced his meat consumption since we've been together. I don't think this is due to any sort of guilt tripping from me (I hope!) but because of the tasty vego food we make together. Andy has also learnt more about nutrition and so understands appropriate portion sizes for meat better now. We like the idea of 'meat as a treat' - choosing great quality, free-range or organic meat and paying more for it but buying less. As the quality is higher, you need to use less and having it less often makes you appreciate it more. 


In the past I have been an active dumpster diver. I have collected food from bins all over Brisbane. When you start doing this it can really shock you. The quality of the food is amazing but the quantity is the really shocking thing. One of my regular haunts regularly had half a dozen wheelie bins full of fruit and veg on every visit. The photo below is a selection from one night's diving. There would have been 10 times that amount left after we were finished. It is estimated that we throw out over $6 billion of food a year from Australian households...I'd hate to think what the value for retail stores and restaurants would be.


I dumpster dive less since signing up for Food Connect. I'm not against diving any more, I still stand by the reasons I started doing it in the first place (namely, reducing the amount of food going to landfill) but we get enough food from our subscription. I also like that I'm supporting the farmers and hopefully making small steps to change. This is the reason I've always struggled to wholly support the freegan idea. I don't think we can see change unless we support those attempting to produce better products. Choosing to not spend at the large chain stores is one thing but neglecting the little guys trying to make a difference as well doesn't create change. 


Since reducing my dumpster diving nights (or possuming, as I like to call it - after overhearing some packing staff say "Here come the possums" one night), I've been looking into some ways others are working on the supermarket food waste problem. I was glad to see a post on one of my favourite blogs about this here. Tricia gave some great links to charities and groups working to redistribute the food before it gets sent to landfill. 


I guess this whole (rather long) post is about making the choices that are right for you. You can only work within your limits of time and money. Research your food and make active choices about what you buy. You'll feel better for it!  

Jessie's guest Green Cleaning post

I twisted Jessie's arm at the last SkillCycle day and convinced her to write something for the blog. So, with much excitement, introducing our first guest poster - Jessie!


There are lots of different motivations to get into green cleaning – for example, for healthier skin, safe grey water for our gardens, to help protect our waterways, to consume less, and to save money.

Some of us also have particular things that keep us from actually doing it – for me, it was uncertainty about whether I could get things ‘really’ clean (I was also wary of the smell of vinegar, until I realised it has no scent when it dries). Then the Queensland Floods happened in January. With water and sludge up to 2 metres up the walls, and the threat of mould enveloping the entire house, I had more cleaning to do than in the rest of my life so far, and didn’t want to inflict any more damage on the natural world than the disaster had already done.

Starting with clove oil to kill mould spores, and baking soda and vinegar to clean almost everything else, I realised greener methods could be extremely effective.  (And after the initial double-take on the cost of 10 ml of clove oil, I realised that with something so effective when using only a few drops per bucket, I could clean the entire house several times, for less than the cost of one spray-pack of ineffective whiteners. I still have ½ the bottle left).

Since then I’ve gleaned more information from friends, books and websites, and hope that this set of ‘Green Cleaning’ basics will be helpful for everyday (everyweek/month) cleaning and for dealing with some of the rarer tasks and accidents.  Ideas and links are really welcome!

Jessie

Monday, December 19, 2011

Feeling 'trapped'

Maybe it's just the time of year, and the lack of holidays, but I'm feeling a little stuck. Like I'm in a rut. Most of the time I can gaze at pretty photos of idyllic farm life on my favourite blogs, those who have 'escaped' to the country and are living my dream, and feel inspired. At the moment, all I can feel is jealousy and apathy. My overdue PhD is still going, I haven't many job prospects for next year and I feel like I'm treading water. 

The view from my office window
What do you do when you get this way? Take a holiday, do yoga, garden? How do we keep ourselves inspired and hopeful while still living consciously in the present? 

Tuesday, December 13, 2011

Bliss balls

Photo from a great vegan blog  Of The Kitten Kind 
Bliss balls are not my creation, they've been around for years. Most of you will have seen them selling for crazy prices at the front counter of your local health food store. Thing is, they're really easy to make. There's no recipe really, just a few things blended together to make a tasty snack. You can make them as healthy or as unhealthy as you like. At their simplest, they're a blend of nuts, seeds, dried fruit and a sticky sweetener. Here's the 'recipe' for one of my most popular mixes. I never measure any ingredients, just pour and adjust if needed.


Bliss balls (all measurements are guesses)

1 1/2 cups almonds
1/3 cup sesame seeds
1/3 cup cashews blended into a paste
1/2 cup desiccated coconut
2 TB honey
1 TB cocoa powder
3/4 cup dried cranberries
1/3 cup LSA

Grind your cashews into a paste in food processor. Blend your almonds in a food processor until they form a nut meal (like a breadcrumb consistency). Process dried cranberries in almond meal quickly to chop them a little. Mix in all other ingredients in bowl, add more honey if too crumbly. Taste, adjust sweetness to your liking. Can add a little oil if not binding. Roll into balls then roll in coconut or sesame seeds. Refrigerate til ready to eat. They will last a months in the fridge if you can stop eating them!


Other options for mixes: macadamia nuts, dried apricots, dates, cinnamon (and other spices), sultanas, wheatgerm, tahini, vanilla, chocolate. A quick google will bring up hundreds of great combos. 

Monday, December 12, 2011

Tomato Zen

I recently made a new veggie garden bed in my backyard. I used the no dig lasagne method and planted some seeds in punnets while I waited for the bed to be ready. I used compost and sand to raise my seeds but soon realised my mistake. I got nothing but tomatoes in those little punnets! Clearly my compost bin isn't getting hot enough to kill off seeds in the mix. I also wonder whether tomatoes have an ability to prevent the germination of other seeds. Many plants release toxins into the soil to reduce competition from other plants (it's called allelopathy) but I haven't heard of it in tomato plants before. 

Anyway, I got cranky and pulled out most of the self-seeded tomatoes. As I'd built the garden bed using compost for multiple layers, I started seeing tomatoes coming up in there as well. I gave up and just let them go, not expecting much. Little did I know, this would be the most successful tomato season I'd ever had! These self-seeding plants produced a better crop than any expensive seed I'd ever mollycoddled into existence.


The zen of vegetable gardening. Sometimes you just have to let things go.

Friday, October 21, 2011

SkillCycle II - frugal gardening and more

So, the second SkillCycle day was a success! We covered pasta making with Kate, knot tying with Kerry, bliss balls with Bron (yum!), green cleaning with Jessie and I did frugal gardening. 


My session covered a range of bits and pieces you could collect from around the home/in the bin/on the kerbside throw-out to make gardening cheaper and more sustainable. I went through different options for growing containers like olive oil tins, small tins, yoghurt containers etc., and making your own pots out of newspaper, toilet rolls or egg cartons. Then I discussed making labels for your pots out of recycled food containers (like milk bottles and yoghurt tubs again) as well as old venetian blinds you find on council kerbside recycling days.


I spoke about saving seeds and my general motto of 'give it a go, you never know'. Some seeds are easier to save and grow than others but you'll never know until you stick some in the ground. Remember to try the pantry and your spice rack.  


We also covered protecting your garden from bush turkeys and possums. I absolutely love bird netting for this purpose. I had little success with my veggie beds until I covered the whole garden in netting. Now I only have to fight caterpillars and grasshoppers; much nicer than the total annihilation you get from the possums and turkeys! The stuff is very cheap at your local hardware store or nursery. You do have to keep it quite low and watch no birds get tangled in it though.


All in all it was a lovely, inspiring day. I went home and planted some seeds, made some bliss balls (recipe to come in a later post) and generally felt like I'd accomplished something. 


Friday, October 14, 2011

BOGI Fair - other inspirations


As I mentioned in a previous post, I'm always inspired at BOGI Fair's. The year before I joined a Community Exchange System called LETS (Local Energy Trading Scheme) after speaking to Adrian who has a LETS stall each year. Our local branch is called BrisLETS but there are many groups all over the world. The system works as a multi-way trading scheme. In other words, I can sell something to another member which puts credit into my account, I can then use that credit to purchase something or pay for a service from any other member. While I like small one to one trades within my community, LETS allows for a lot more flexibility. And there is a huge variety of services and products for sale.


My other stall neighbour this year was Marilena. She was selling her homemade cakes and cards. None of us could resist her elderberry flower and mulberry cupcakes. I chatted to her throughout the day about SkillCycle and why we both do what we do. We both feel the same way about not really doing any of this for 'profit' (in the conventional sense). We both just enjoy showing people how easy it is to make delicious food from locally sourced and sustainably grown food. Marilena also helps organise a yearly winter feast in Samford (north west of Brisbane) with fresh local produce being shared by the whole community.


Quite a few Transition Towns members approached the stall throughout the day. These groups do so much more than can be described in a few lines so you can read about them here. I've been meaning to join my local group for awhile now.


I've heard Stan from Sizzling Solar Systems and his wife Jane speak on numerous occasions but he's always impressive so I popped by for another demo. I also love hearing the ooh's and aah's from people who have never seen Stan set fire to a piece of wood in seconds using only a salvaged satellite dish, base of a student desk chair and some shiny chip packet liners. He's like a modern day MacGyver. Who cooks.


All in all, a very inspiring day!

Friday, October 7, 2011

A Plentitude Economy

Watching this video gives me hope for the future. Change is possible and the happenings on Wall Street right now make me believe there's more people who want this than just me.
 

Thursday, October 6, 2011

BOGI Fair

Last Sunday Kate, Mel and I headed out to Albion for the annual Brisbane Organic Growers Fair. This is our third fair. I really look forward to these events. They're a great opportunity to talk to people who are all involved in really interesting aspects of food production, education or community development. And it's also the perfect time to pick up some new plants and tasty things to eat.


Mel and I made some preserves (Strawberry Balsamic Jam, Tomato Jam and Old Fashioned Zucchini Pickles) and organic potato and onion soup with home made bread to sell. Kate was a baking demon and put my little loaf to shame with a massive bag of her own bread. 


Because she's so hardcore, Kate also brought her popular Rosemary Crackers (they always sell out fast...maybe she'll post her recipe here one day...and some time saving pointers she learnt the hard way) plus her home grown herbs. 


Kate also brought along some dried culinary lavender. This stuff is very useful. She discusses it here.


Everything sold really well. I love how the community comes along to these days to learn something new and support local growers and makers. I always leave with new ideas and a big grin, definitely an inspiring day. I'll post again soon about some of the people I spoke to and the amazing things they're doing.


Wednesday, October 5, 2011

SkillCycle Day II - planning your own day.

Our next SkillCycle day is approaching so I thought this would be a good opportunity to let you know what we have planned and give you some ideas for hosting a day of your own. 


This time 'round we have planned a green cleaning session with Jessie. This will involve a bit of a demo and then a Q & A for green solutions to specific cleaning problems. We'll then have a frugal gardening session where I'll discuss seed saving, making your own pots from newspaper and toilet paper rolls as well as salvaging 'rubbish' for the garden. We're also hoping to have a session on sourdough cultures and one on spinning your own yarn by a new SkillCycler, Jane. 


We recently had a stall at the BOGI (Brisbane Organic Growers Inc) Fair (I will post about this very soon) and took the opportunity to tell some of the attendees about the theory of SkillCycle. We had a great response and I enjoyed seeing the enthusiasm from all the people I spoke to. The main point Mel, Kate and I tried to get across is that SkillCycle days needn't be huge events, they just need to have an exchange of information. You can run a day in an hour with only two people - you just need to teach each other something. The whole idea is based in the sharing of knowledge, big or small.


So, if you're not local enough to come along to our next day (Oct 23, comment if you want more info), why not organise your own SkillCycle day! You just need a skill to demonstrate, someone interested in learning that skill and a place to sit down together. Skills to teach can be anything you're both interested in. While most of the skills we share are quite domestic, we're trying to include more mechanical skills in future days. If you don't feel you have anything to share why not take it upon yourself to learn something new and then offer to teach it. The best way of learning is often teaching. Just give it a go! Anyone planning any days already? We'd love to hear about it!

Saturday, October 1, 2011

Cooking with Lavender


I love lavender, the little purple flowers and their heady aroma. I have a very productive bush on my front path, which provides me with flowers throughout the summer. I've also successfully propagated lots of little lavender bushes which have exploded beneath my clothes line, and have begun to surpass the productivity of the original bush. I often cut flowers which last for ages in a vase. Last year I cut some flowers for drying and ventured into culinary uses for the dried flowers. They add quite an unusual flavour to dishes, obviously floral, but quite a musky depth of flavour. It might not be to everyone's taste, but I really like it, particularly in scones and cupcakes. With such a strong flavour, only a very small amount is required for most recipes I've found.

Stephanie Alexanders's Kitchen Garden Companion has a whole section on lavender, on growing, harvesting and drying the flowers. She suggests whizzing up a dried flower head with caster sugar and using the sugar to top iced cakes and make meringues. There is also a recipe for some nice lavender scones.

Lavender Scones
2 1/2 C self raising flour, plus extra for dustine
1/4 C pure icing sugar
1/2 teaspoon dried lavender flowers
1/2 C thickened cream
2/3 C milk
jam and cream to server (of course!)

Preheat oven to 240C. Sift flour and icing sugar into a mixing bowl and add lavender. Cut cream in with a pastry scraper or broad spatula. Mix in mile quickly.
Sift a little flour over a chopping board and over a baking tray. turn dough onto floured board. Pat into a rectangle and cut into 6cm squares. Separate and place dough squares onto floured baking tray. Bake for 5 minutes or until browned on top. Reduce over to 180C and bake for a further 10 minutes.

A quick google search will also provide you with many more culinary options. I've made these really nice cupcakes with lavender, an usual and sophisticated change from vanilla cupcakes.

Other ideas that would be interesting, lavender icecream, lavender flavoured cream in profiteroles or in a sponge cake, lavender icing. Dishes with lamb or rabbit might work as well, like as a stuffing.

We also had a wine when travelling in France that had been spiked with lavender that was amazing on a hot day. It was a white wine (not sure what type), with a sugar syrup added in and a sprig of lavender. It was then left for about a week before drinking. Serve very cold.

Thursday, September 15, 2011

Can it like your grammy did.

Can, preserve, jam...whatever your choice of word, it's an old skill that has a sense of nostalgia. It brings to mind images of heavy laden trees, abundant harvests, kitchens full of people, long days of work and a glowing sense of satisfaction at the end of it.


I didn't grow up with my grammy's around. But I did inherit their names. Maybe this connection with the past is what compels me towards everything old. I hear stories from friends about their grandma's old canning gear and I wonder how I can find me one of those ladies to adopt and convince to pass me on such treasures. I also hear about various grandma-canning-techniques that leave me wondering how many other old school (sometimes questionable) methods are out there.

In my endeavour to learn more about canning, my two most overused resources have been 1. the internet, and 2. those who are further along this canning journey. As a person who likes to research well before doing and have a clear handle on what's involved, such resources have been invaluable.

As I've clicked along online, I have found American based sites to be the most useful. There is a long and rich history of canning in a country where the seasons are more distinct than my home, as well the ever-present guidelines around canning methods courtesy of the U.S. Department of Agriculture.

As I've collected jars and inspected old lids, googled places to buy new ones and started experimenting it has been great to have others around with their recipe books and useful insights (thanks Lucy!).

So, while there are a number of steps involved with 'canning', there is plenty of good information out there. Recently, the Kitchn posted a list of 5 great canning websites, including Food in Jars, Punk Domestics and National Center for Home Food Preservation (we don't have anything like that do we?!).

It pays to have your basics down pat though because there are many books and online 'recipes' that will lead you astray in your canning technique if you don't know better. Some of the basics include: Sterilising equipment (in boiling water for 10 minutes); using new or very good condition lids* (that means no odours, stains or damage to the seal); making sure you are using the right ingredients to make it safe (i.e. following a trusted recipe); water bathing your preserves for the right amount of time (this varies according to ingredients) and ensuring that your lids have sealed properly.

In the end, I think it's about making informed decisions and having a basic yet solid understanding of the concepts and principles around how canning works. If you are after local information, resources, equipment and people to ask questions of, Green Living Australia are based in Underwood, Logan City. They sell new lids, fancy canning tongs (that save you from scalding yourself with boiling water) and lots of other DIY things for your urban homestead.

As there are a few steps to the canning process, I'm thinking that I will do a series of posts on the finer details. What do you think?

How have your canning experiments gone? Do you have a favourite thing to can?


*Some people would say to never re-use lids. This is where we all make varying choices. The frugal and quite safe response is to inspect these lids VERY carefully then make your decision. I would never sell preserves with lids that have been re-used. Others would say just to keep such lids for storing non-preserved or dry goods...fair call when jars are one of the most versatile objects in your kitchen!

Saturday, September 10, 2011

Strawberry and balsamic jam


I've made this jam twice now. It is just so lovely. My partner loves it on toast...and he's not usually a jam man. When strawberries are so cheap and tasty (now!), it's hard to resist them. 


I found the recipe in Eugenia Bone's book Well Preserved. I like my jam quite thick so while this recipe is for more of a conserve with chunks of strawberries, I cook the jam longer to make it more 'jammy'. You could always adjust to suit your tastes. 


Strawberry Balsamic Jam from Eugenia Bone’s Well-Preserved
8 cups washed and hulled strawberries, halved if large
5 cups sugar
1/2 teaspoon unsalted butter
5 tablespoons balsamic vinegar


Pour the strawberries into a large, deep, heavy pot and bring to a boil over medium heat.  Once the strawberries are boiling, add the sugar and stir until it is dissolved. The sugar tends to burn on the bottom, so keep it moving until it is thoroughly dissolved. Bring to a boil and then add the butter (this helps keeps the foam volume down). Turn the heat down to medium low and boil the jam gently for 40 minutes, until thickened to a loose, soft conserve. Here you can choose to cook the jam another 20 minutes to make it more jammy or just stop here. Stir in the balsamic vinegar.

Fill the sterilised jars with hot jam and put the lids on. Treat the jars for a 10 minute boiling water bath. Remove the jars. Allow them to rest on a dish towel until cool. Check the seals and store in a cool, dark place for up to a year. Refrigerate after opening.


Friday, September 9, 2011

pretty videos to inspire

beet cake from tiger in a jar on Vimeo.

These guys are doing beautiful things with video and food. I could go on about the light, mood and all that but I'll save you some time - just watch it and click over to vimeo if you want to see more.

p.s. I haven't forgotten about my follow up post on preserving...I think about it quite regularly...

Tuesday, September 6, 2011

Introducing Ruby

I live in a rental house in the suburbs. While our landlord is quite forgiving, he draws the line at chickens. I really wanted my own chickens. This situation lead me to a discussion with Mel where she generously offered to be a foster mother to any chicken I may adopt. Long story short, we built a beautiful hen house with the help of Mel's step dad super carpenter extraordinaire (thanks G!) and adopted five lovely girls. Meet my baby. Ruby.


She's a young Plymouth Rock. Isn't she beautiful?


The point of this post is that sometimes you can wait a very long time for your situation to be 'right'. And sometimes you just do the best with what you have. I dream of a time when I have some land for chickens, goats and fruit trees. But while I work towards that dream, I plant avocado seeds in pots and have a foster chicken. Make it work for you.

Monday, September 5, 2011

Cycle Skills!

*Photo from Cycle Skills

Mel and I have had many discussions recently about how we'd like to have a SkillCycle day devoted to home bicycle maintenance. You can imagine my surprise and happiness when I stumbled across Cycle Skills. Even the name made me happy! I can't wait to head out to Seventeen Mile Rocks for a sticky beak. Might even have to drop into the Rocks Community Garden while I'm there.

Sunday, July 17, 2011

From bottom of the jeans pile to the top!

I bought a pair of jeans ages ago on a whim, they were cheap, and were a good enough fit. But I got them home and after one wear they were way too big in the waist and seemed to get longer every time I wore them. Hippy girls are sure to agree that jeans which are a good fit around the hips and bum are inevitably too big in the waist. A belt is usually enough, but not for these, they bulged out beneath a very cinched in belt.

Eventually, after months at the bottom of my jeans pile, I decided to tackle the length issue. Jonathan had a pair of jeans taken up ages ago (by a professional!), and rather than just folding and hemming, they had reattached the bottom cuff so they still look like jeans. So I dutifully copied, and it was super easy.

Just measure the length you want taken up. Cut off at 1cm longer than this length. Then get the cuff end you've just cut off and cut down to the cuff plus 1cm. Pin the cuff (right sides together, so that the cuff is upside down on the outside of the jeans) to the pant leg. With a zipper foot, sew as close to the cuff as possible. Then zigzag or overlock the seam so that the jeans won't fray. Then fold up so the end is facing up and inside the pant leg and iron, iron, iron. If you find the end keeps folding down, just topstich close to the fold. and it is as simple as that.


For the waist, I found this really great tutorial for taking it at the side seams. I was a bit less precise with my method. I didn't bother unpicking the belt loop as I knew it wouldn't quite interfere with the new seam. And I only unpicked about half what they suggested. I did the side seam the same as suggested, just with less precise measuring!

The waist band was a bit trickier to do as I unstitched very much, so I did it a bit differently. I just cut the waist band and cut out enough so that the two ends of the band only slightly overlapped. I unpicked the top few stitches so that it the upper band would sit nicely over the inside band. Then I just sewed over the top. Yes you can see the seam, but they are just jeans, and a belt would cover most of this. The front bit slipped down a bit when repositioning too, that is the darker denim beneath the waist band, but that is only about 0.5cm. No one is exactly going to be staring at the sides of your jeans either!


So a few pointers:
  • Use a denim or heavy duty needle, and have a spare just in case one breaks
  • Sharpen the needle, I think this makes a big difference and will prevent broken needles
  • Overlock or zigzag loose ends as denim frays
  • I just used black thread, but a mustard colour would probably match the rest of the jeans better
  • You can always take in further, so start with a small amount, and try on before cutting
  • Jeans are forgiving and don't need to be perfect, as can be seen in my case.
Took about half an hour for the length and an hour for the waist. Now they fit perfectly, and the cuffs won't get all wet when it rains and I can bend over with no fear!


Wednesday, July 13, 2011

More citrus!

If you've scanned past posts you would have noticed marmalade getting a mention here and there. What began as a quick trial of marmalade with some lovely little mandarins from the market a few weeks ago led to a repeat showing of the same at the first SkillCycle day.


As you probably know, marmalade is not everybody's cup of tea. It's not usually mine. Or Lucy's. But hey, I have loved ones that like it and, most of all, it's citrus season. In my house at this very moment there's a big bag of hand picked oranges from a friend, the leftover mandarins from SkillCycle, a small bag of blood red oranges that I couldn't resist (their season is apparently very short), and a mix of lemons, lemonades, mandarins and oranges from our Food Connect subscription.
It's getting out of control...


But why mandarin marmalade, you ask? Well, why not? They're a whole lot easier to prepare for marmalade compared to other citrus. They're easy to peel and we simply leave them in their little segments, removing loose pith and halving them to remove seeds. As I'm not a huge marmalade fan, I halve the quantity of rind used to give a milder, less bitey and bitter flavour. This seems to work quite well coupled with the sweetness of mandarins.


The recipe we have been following is over at a table for two.

There was a couple of things we did differently:

- 1kg sugar and 5 cups of water instead of 1.2kg sugar and 6 cups of water

- We cut 1/4 of total mandarin peels into strips (instead of 1/2)

- We put the jars in boiling water for 10 minutes to sterilise them (not in the oven)

- We sealed jars right after filling them with marmalade (not 15 minutes later as the table for two recipe suggests)

If you were one of the lucky ones who took mandarin marmalade home from the SkillCycle day, let us know what you thought! My impression was that it was more bitter than the first batch Lucy and I made. This may be due to the first mandarins being especially sweet and juicy.

Keep your eyes peeled as I'm going to follow up this post with another about general jam making and preserving.


Link

Lazy girl bread

As promised, my easy bread recipe. I call this my 'Lazy Girl Bread' because sometimes that's what I am. But I still want fresh, homemade bread. This is my compromise. The recipe has a followed a strange convoluted pathway to what I make now. Hannah found the original recipe on Mother Earth News and she tells me it came from a New York Times recipe before that. She gave it to me and I changed the technique and quantities over time to suit my kitchen and my oven. I think many bread recipes that originate in cooler climates need quite a bit of tweaking to work in a humid Brisbane kitchen. This one works very well for my schedule which is important if you're going to be realistic about making bread regularly. It's all very romantic to imagine kneading bread for hours and baking beautiful, gourmet breads each day but in reality, many of us have limited time and just want tasty food quickly. This bread serves this purpose and is good looking as well.

Lazy girl bread

Ingredients

4 cups flour (any mix of wholemeal, white, rye etc.)
2 cups lukewarm water
1/2 teaspoon dry yeast
2 teaspoons salt
extra flour (for dusting)

Equipment

one large mixing bowl
large pot with lid (Pyrex glass, cast iron, or ceramic), if your pot is smaller reduce to 3 cups flour to 1.5 cups water and reduce the yeast an salt a little.
wooden spoon (optional)
plastic wrap (or reuse a plastic bag)

one cotton/linen tea towel (not fluffy) ricotta basket(you get these free when you buy large amounts of ricotta but a colander or basket would work too)

Process

Mix flour and salt in bowl. Mix yeast into water until dissolved. Add water to flour and mix by hand or with a wooden spoon for 30-60secs. Cover the bowl with plastic wrap/bag and let the dough rest 12hrs at room temperature. You can mix dough in morning for a night bake or at night to rest overnight for a morning bake.

Sprinkle a little flour on your bench top. Remove the dough from the bowl using a spoon and tip it onto the floured surface. Fold the sides up into the centre and then flip the dough, tucking it under. Let the dough rest 15 minutes on the bench top. Line your basket with a tea towel and then generously coat tea towel with flour. Place the dough seam side down on the towel and dust with flour. Cover the dough with tea towel and let rise 1-2 hours, until more than doubled in size. Preheat oven to 240-250°C. Place the pot in the oven at least 30 minutes prior to baking. Once the dough has more than doubled, remove the pot from the oven and tip the dough into the pot. Cover with the lid and bake 30mins or until showing some colour. Then remove the lid and bake 15-30mins uncovered, until the loaf is nicely browned. You’ll notice a change in the ‘smell’ of the loaf, from warm bread to slightly 'toasty', that’s a good indicator of the loaf being done. Otherwise, tapping on the loaf and listening for a hollow sound is another good technique. You want to cool the loaf out of the pot on a rack. It is important to wait until the loaf is cool before you cut it. Try to resist. Try hard.

Tuesday, July 12, 2011

Olives!


I just bought a half kilo of olives at the local fruit shop, the Italian man who runs the store gets them from a family friend. I have no idea how to prepare them but they were super cheap and looked glossy and tasty so I had to buy them. Off to read about curing olives. Any tips?

Monday, July 11, 2011

Blood Orange Cordial


Food Connect has blood oranges in season at the moment and I couldn't resist buying a bag. It never ceases to please me when I cut one and see the 'blood' inside, so vibrant and beautiful. I hadn't really planned what to do with them but found a delicious sounding recipe for blood orange cordial and had to give it a try. It was really easy and the recipe lends itself to any fruit based cordial. I cut down the sugar in my version as I like my cordial with a little more zing, and the oranges were quite sweet naturally. I'm planning on using this cordial with soda water...and maybe vodka.

Blood Orange Cordial

makes about 750ml

2 cups blood orange juice
1 cup white sugar
2 cups water

Mix all ingredients in a saucepan. Bring to the boil and then simmer slowly until reduced by one third. Allow to cool in the pan and then strain into a sterilised bottle. Keep in the fridge and mix with soda or still water to taste.

Sunday, July 10, 2011

Leftovers far "outwhey" the cleanup


On Saturday I hosted the first SkillCycle day at my house. Sure there was a bit of cleaning to do in preparation and a bit of clean up after, but the leftovers I have in my fridge far “outwhey” these negatives!

Sunday morning I feasted on Lucy’s leftover bread (which we made), toasted with leftover marmalade (which we made). Then I gave Lucy’s plum jam and apple tart a new life by mixing it’s innards into some of the leftover yogurt (which we made), that was really yummy.

Being a newbie to the idea of leftover whey from the cheese (which we made), I do what I usually do and googled “whey recipes”. I’m a slave to a recipe, but I rarely have major kitchen disasters because someone has already done that in coming up with the recipe! One of the first I landed on was for whey biscuits, not aussie biscuits, but southern American biscuits, like a savoury scone, see photo. These were perfect as they required fair amount of whey (which we made) and a hot oven, and I was already cooking the leftover bread (which we made) in a hot oven. So while the bread was cooking, I mixed up the biscuits, and baked them in the oven with the bread. I used butter instead of shortening, and they could have used a milk (or whey!) wash before baking to aid in browning. But they were ready in no time and delicious with some of cheese (which we made) for morning tea.

While googling for whey recipes, someone talked about a while sauce they had done using whey. I rarely go without a recipe, but white sauce is one I’m pretty familiar with, thanks to being chief gravy maker for Sunday roasts. White sauce is pretty much gravy in disguise. Just melt a tablespoon or so of butter, add equal quantity of flour and cook for a couple of minutes. Add a cup or so of liquid: this can be water, milk, stock or whey, and stir until thick, you can also add cheese, onions, and other yummy bits to your sauce.

I remember from living in southern America that biscuits are usually served with sauce or gravy of some sort. So for dinner I served up some whey biscuits doused in white cheese sauce made off whey (I’m calling it “Wheyte” sauce), and leftover salad from Saturday’s lunch. Yummo!

So in hosting a SkillCycle day, it’s not just dirty dishes that get left behind!!

First SkillCycle Day

Our first SkillCycle Day went off without a hitch Saturday! Nine of us met at Kate's house to share our skills and learn new ones. Kate welcomed us wih tea and pumpkin cake and then we got to work.


We started with my easy no-knead bread (recipe to follow)
which I made with very basic ingredients.


Hannah gave us a demo on her technique for cheat's 'ricotta' and yoghurt.


We took a break for lunch digging into some of our delicious fresh bread and cheese. Next up was a jam making with Mel. She spoke about the importance of sterilising your jars and equipment and the benefits of boiling water baths for making safe preserves.


Mel will post her recipe for the tasty mandarin marmalade soon. Kate's turn was next and she ran us through some basic sewing skills, talked about the differences between regular sewing machines and overlockers and then knocked up a quick produce bag. Kate will hopefully post about this at a later date.

Overall I think they day went very well. Everyone went home with something made on the day, leaving with either some marmalade or some bread and hopefully a head full of ideas and inspiration.

Monday, July 4, 2011

Preparing for the day...


Kate, Hannah and I (Lucy) sat down for a meeting over afternoon tea (where we debuted the balsamic onions made last week and ate the rest of a jar of the pickles) yesterday to make sure we had everything sorted for Saturday's SkillCycle day. We want to ensure the day runs smoothly so lists were made and plans were hatched. We have decided that it will go something like this: first a demo on how to make my lazy girl bread, then yoghurt and ricotta making with Hannah. Hopefully we'll then have some yummy fresh bread and homemade ricotta for lunch. Then back to work with jam making and water bath preserving by Mel, followed by basic sewing skills and how to make your own produce bags by Kate. It will be a full day with lots on hands-on activity and hopefully everyone will leave with something made on the day!

We'll take plenty of photos and post an update after the weekend.

Sunday, July 3, 2011

In a pickle...


I've always wondered about that saying...I guess being in trouble could be likened to being crammed in a tight space with vinegar and spices. At a stretch. Hmmm, they also say "in a jam". Maybe I should start a new saying? "Oh dear, I'm in a bit of a chutney!"

Mel mentioned in her last post that we also made a couple of other preserves from things we got on our market run. We found some lovely small cucumbers and some plum sized brown onions and couldn't resist making pickles! The cucs were turned into simple pickles with some apple cider vinegar, peppercorns and celery seeds. But we came across a tasty idea for the onions over at Cook (almost) Anything. We haven't tried the onions yet but the cucumbers are delicious! The recipe is a simplified version of a recipe found on one of my favourite blogs, Food in Jars.

Pickled cucumbers

makes about 5 small jars
1 kg small lebanese cucumbers
3/4 cup apple cider vinegar
3/4 cup filtered water
2 teaspoons sea salt
celery seed and black peppercorns(but any spices will do)
Wash and dry the cucumbers. Chop ends off and slice into spears. Set aside.
Combine vinegar, water and salt in sauce pan and bring to a boil.
Put half a teaspoon of celery seed and half a teaspoon of peppercorns in each jar. Pack the cucumber spears into the jars tightly.
Pour the brine into the jars, leaving 1cm headspace. You may need more vinegar brine, if so, just mix up another batch in the ratio described. Put lids on the jars and boiling water bath them for 15mins. Resist eating them for at least a week to allow them to cure.